Every web application needs an admin panel to control and monitor its functionalities. Web developers are responsible to develop a functional admin panel for those applications. With an admin panel, both clients and developers can handle the application easily for dynamic operations, such as creating pages, posts, modules, titles, metadata and other features. Therefore an admin panel is essential for web applications as it gives a platform to manage all website utilities.
Laravel is one of the most commonly used PHP development framework all over the world. It provides great built-in features to develop large scale applications. The fact remains that it doesn’t provide any organized admin panel for its applications. Hence sometimes, it becomes a bit tedious job for developers to manually develop a panel for Laravel applications. An admin panel which can manage and perform different functional tasks, is where the usability of Voyager comes into play, and its vital importance for Laravel apps.
What is Voyager
Voyager is an admin panel package used to develop centralized admin management system for Laravel applications. It takes control of all the administrative tasks and makes management easier. With Voyager, both developers and clients can access a dashboard which is capable of performing different managerial tasks.
Voyager is completely compatible with Laravel 5, and supports the latest version. You can easily develop a quick back-end management panel with Voyager and won’t have to worry about any development hassles.
The most important utility of the package is its pre-developed feature, BREAD (Browse, Read, Edit, Add, and Delete), which allows you to easily perform any administrative operation to your posts, pages or in any other module. Other than BREAD, Voyager comes pre-built with a Media Manager, Menu Builder, Database Manager and many other administrative tools.
Prerequisites
For the purpose of this article, I assume that you have a Laravel application installed on a web server. My setup is:
- Laravel 5.5
- PHP 7.1
- MySQL
I have decided to host my Laravel application on PHP MySQL hosting. It has great devstack and is known for its highly secured platform. You can also try out Cloudways for free by signing up for an account. After completing the signup, the following GIF will help you to setup your server and Laravel application within minutes.
Install Voyager Package
After successful installation of the Laravel application, it’s time to install Voyager package using the Composer command. With the installation of this package, a back-end admin panel quickly generates for my application. The command is:
composer require tcg/voyager
Configure the Database
Now I will setup the MySQL database and will configure it in my Laravel application. In the root directory, there are two files with the name ‘.env’ and ‘config/database.php’. I will add my database credentials (username, DBname, and password) in both of these files to setup the database and allow the Laravel app to access from it.
Configure Voyager
Next, I will add Voyager service provider in app.php file, which will update Voyager package to the list of supported Package Service Providers. This list is located inside the directory config/app.php. So now let’s just add Voyager service provider in app.php file:
‘providers’ => [
// Laravel Framework Service Providers…
//…// Package Service Providers
TCG\Voyager\VoyagerServiceProvider::class,
// …// Application Service Providers
// …
],
Voyager Dummy
Now, to have some dummy files and data for Voyager admin panel, I will execute the below-mentioned artisan command which will generate some dummy files for the panel.
php artisan voyager:install –with-dummy
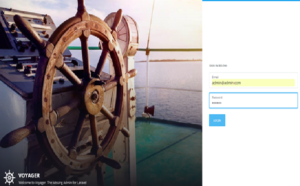
Laravel Voyager Admin dashboard
After successfully installing all the required packages, now I will run my Laravel application to check newly installed voyager admin dashboard. For logging in, default
email :admin@admin.com and password is:password.
Dashboard
In the Dashboard section, there is whole lot of stuff to play with. We can manage all operations of the application from the Dashboard. We can get the summarized detailing of whole app from the dashboard. As we can see how many users have been created, how many posts have been generated, how many pages have been published and lot of other functional things.
Further, Dashboard also allows you to see the Google analytics report of your application by setting the key of your analytics client id generated by Google developer console.

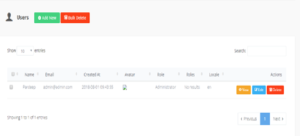
Create Users
From the Users section, we can easily manage all the Users in our application. We can add new users, can update their details and similarly can delete the not required ones from the section.
Roles
From the Roles section, we can define particular roles for each user. For an instance, if we want to assign administrator rights to a particular user, then we can do so by going into the Roles section.

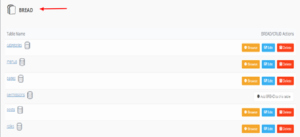
BREAD/CRUD Builder
Voyager provides an built-in feature known as BREAD, i.e. Browse, Read, Edit, Add and Delete. Using this functionality, you can easily add any views and functionality to the database.
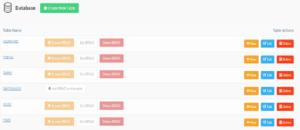
Database Manager
With the Database Manager of Voyager, you can manage your application’s database directly from the panel. It gives you the power to add, edit or delete tables from the database, helping you to manage all operations from one place.
While creating a new table, you can also specify whether to create separate back-end module for it or not. As simply selecting the option of ‘Yes Please’ will generate a module for it at the back-end, and selecting ‘No thanks’ will just create the table in database.
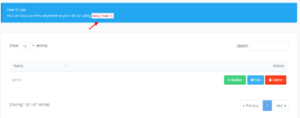
Menu Builder
Using the Menu Builder of Voyager, you can easily create menus for your site, organize them in desired order and can also display them with the below-mentioned command:
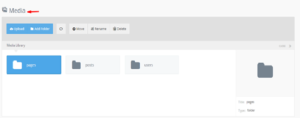
Media Manager
Voyager comes with the fully functional built-in Media Manager, which allows you to easily view, edit and delete files from your app’s storage. You can access all files of your application through this Media Manager and perform desired action through it. It is compatible with localhost as well as with s3 file storage.
Settings
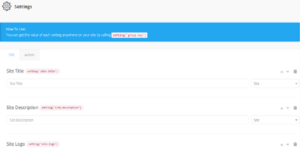
From the settings section, we can set our website title, description, logo and other stuff easily. Just enter the fields with required information or data and Voyager automatically sets up all for the application. However, if you want to add these manually by yourself, then just copy and paste the short code given there to your desired PHP file.
Summing Up!
In this blog, I have demonstrated how to install Laravel Voyager in an application with a fully functional back-end admin panel. As a matter of fact, Laravel doesn’t provide any built-in admin panel for its applications. Instead, developers have to deploy one themselves. But using Voyager, the task for developers to integrate a back-end panel gets easier. As just installing Voyager, a fully functional admin panel for applications, deploys quickly, giving both developers and clients ease to handle all operations of the website smartly.
Still if you have any questions regarding the installation and usage of the Laravel Voyager, you can just leave your queries below in the comments section and I will answer them accordingly.