
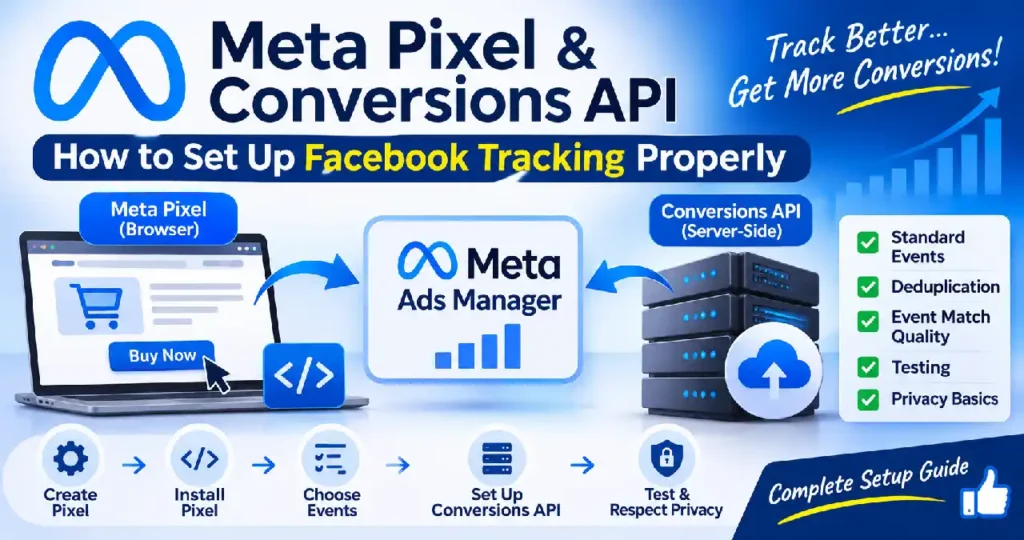
If you run Facebook or Instagram ads, your tracking setup decides how well Meta’s delivery system can find buyers for you. Broken or missing tracking is the most common reason I see small business campaigns struggle: Meta simply can’t tell who converted.
In my Facebook ads for beginners guide, I said to set up tracking before spending anything. This guide is the detailed version: what the Meta Pixel and Conversions API are, how to install them, how to avoid double counting and how to check everything works.
Pixel vs Conversions API: what’s the difference?
| Meta Pixel | Conversions API (CAPI) | |
|---|---|---|
| Where it runs | In the visitor’s browser (JavaScript) | On your server or a server-side tool |
| What it sends | Page views and actions on your site | The same events, sent server-to-server |
| Weak spots | Ad blockers, browser privacy limits, slow pages | Needs more setup |
| Best use | Always install it | Add it alongside the Pixel |
Meta recommends a redundant setup: send the same important events through both the Pixel and the Conversions API. The browser catches what the server misses and vice versa, as long as you deduplicate them (more on that below).
Note: In Events Manager, Meta now groups Pixel and Conversions API events under a dataset. You’ll see both names, but they refer to the same tracking setup.
Step 1: Create your Pixel (dataset)
- Open Events Manager in Meta Business Suite.
- Click Connect data sources > Web, name it after your website, and enter your URL.
- Make sure it’s connected to the ad account you’ll run ads from.
Step 2: Install the Pixel on your website
Choose the method that suits your site:
- Partner integration (easiest): WordPress/WooCommerce, Shopify, and many other platforms have official Meta integrations. They install the Pixel and often the Conversions API in a few clicks.
- Google Tag Manager: add the Pixel base code as a Custom HTML tag firing on all pages, then add event tags. My Google Tag Manager guide explains triggers and testing.
- Manual code: paste the base code into your site’s
<head>on every page.
Step 3: Choose your standard events
Meta has predefined standard events. Use them rather than inventing your own names, because Meta’s optimisation understands them:
| Event | When to fire it |
|---|---|
PageView | Every page (fired by the base code) |
ViewContent | Product or key service page viewed |
Search | Site search used |
AddToCart | Item added to cart |
InitiateCheckout | Checkout started |
AddPaymentInfo | Payment details step reached |
Purchase | Order completed (include value and currency) |
Lead | Form submitted or enquiry made |
CompleteRegistration | Account or webinar sign-up |
Contact | Call, email or WhatsApp click |
For ecommerce, Purchase with the correct value and currency is essential. Without it, Meta can’t optimise for revenue or report return on ad spend.
Step 4: Set up the Conversions API
Options, from simplest to most technical:
- Platform integrations: WooCommerce, Shopify, and similar platforms can send server events automatically once connected.
- Conversions API Gateway / Signals Gateway: Meta’s hosted options that run server-side for you, set up from Events Manager on a cloud account.
- Server-side Google Tag Manager: send events from a server container.
- Direct API integration: your developer sends events from your backend, useful for leads confirmed in a CRM or offline sales.
Step 5: Deduplicate events (don’t skip this)
If the Pixel and the Conversions API both send a Purchase for the same order, Meta needs to know it’s one purchase, not two. Meta’s recommended method:
- Send the same event name from both (for example,
Purchase). - Send the same unique event ID:
eventIDin the Pixel andevent_idin the Conversions API, such as the order number.
Meta deduplicates matching events received within 48 hours of the first one. Most official integrations handle this automatically, but always check. Double-counted purchases make your results look better than they are and mislead the algorithm.
Step 6: Improve Event Match Quality
Event Match Quality (EMQ) is a score from 0 to 10 in Events Manager that shows how well your events can be matched to Meta accounts. Higher scores generally mean better optimisation and attribution.
To improve it, send more customer information parameters with server events, where you have consent:
- Email and phone number (hashed with SHA-256 before sending; most integrations do this for you)
- First and last name, city, postcode, and country (hashed)
external_id(your own customer ID)fbpandfbcbrowser and click IDs, client IP address and user agent (not hashed)
Step 7: Test everything
- Meta Pixel Helper (Chrome extension): shows which Pixel events fire on each page.
- Test Events tab in Events Manager: perform actions on your site and watch browser and server events arrive.
- Check deduplication: events should show as received from both browser and server but counted once.
- Diagnostics tab: fix warnings such as missing parameters or domain issues.
- Place a test order or submit a test lead and confirm
PurchaseorLeadarrives with the right value.
Also verify your domain in Business Settings > Brand Safety > Domains. It confirms you own the site your ads send traffic to.
Privacy and consent
Tracking must respect your visitors and the law. Depending on where your customers are, rules such as GDPR in Europe and India’s Digital Personal Data Protection Act may require clear notice and, in some cases, consent before tracking. Practical steps:
- Update your privacy policy to explain Meta tracking.
- Use a consent banner where required, and only fire tracking for visitors who agree.
- Don’t send sensitive data (health details, financial information) in event parameters or URLs.
I’m not a lawyer, so check what applies to your business.
Common tracking mistakes
- Choosing the Traffic objective because conversions “don’t work”, when the real problem is broken tracking.
- Installing the Pixel twice (plugin plus manual code), doubling every event.
- Firing
Purchaseon page load of the cart instead of the thank-you page. - Missing
valueandcurrencyon purchases. - Running Pixel and Conversions API without deduplication.
- Never checking Events Manager diagnostics.
Frequently asked questions
Yes. Meta recommends using both together, with deduplication.
Yes, Meta doesn’t charge for it. Hosting a gateway or using a third-party tool may cost money.
The Pixel adds a small script. The Conversions API runs server-side and doesn’t add browser load. Keep an eye on Core Web Vitals when adding tracking tags.
GA4 measures your whole site and all channels, but it doesn’t feed Meta’s ad optimisation. Use both. See my GA4 tutorial.
Related guides on WebTechHelp
- Facebook ads for beginners
- Google Tag Manager guide
- Google Analytics 4 tutorial
- Landing page optimisation
- WhatsApp Business marketing
Sources
- Meta for Developers: Handling duplicate Pixel and Conversions API events
- Usercentrics: How to improve Meta Event Match Quality
- Relevant Audience: Meta Pixel and Conversions API: how they work together